
Tutorial Difficulty: Intermediate
Time Required To Complete: ~ 15min
Category: Design
Hello and welcome to another PS Tutorial.
Today we will learn how to create a nice looking smiley inspired from the Yahoo one:

Another result:

We will be using the Selection Tools , Blending Options, the Free Transform Tool and the Rulers to obtain symmetrical results:
So let's get started.
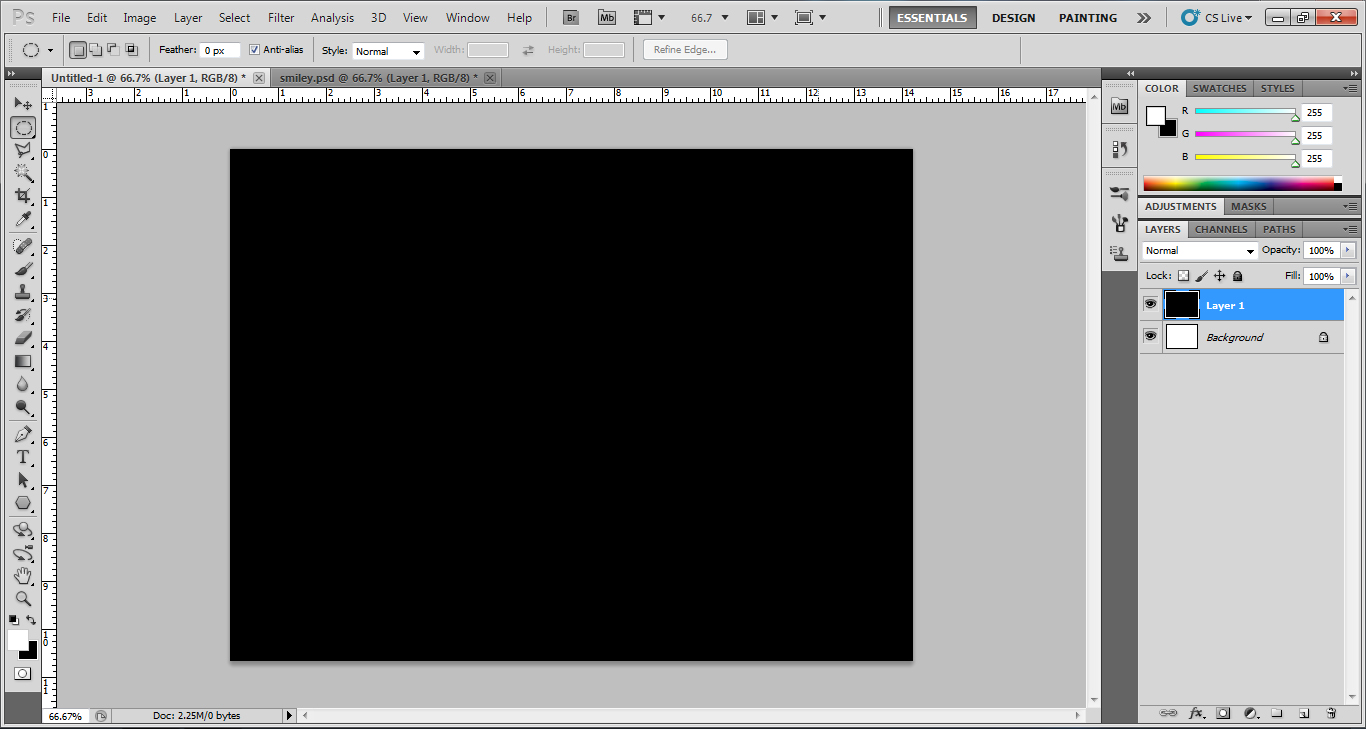
Step 1: Create a New Layer on top of the Background Layer and Fill it with Black:
Step 2: Right Click on this new Layer > Blending Options > Gradient Overlay and modify the first gradient color to a light blue (#00ccff) and the second one to pure black. Also change the Gradient Style to Radial and increase the Scale to 150%:

Step 3: Bring up the rulers (CTRL+R) and press click & drag from the left ruler to add a guideline to the middle of the photo (the ruller will automatically snap to the middle), then click & drag from the top ruler to the middle again. This will be our guides for the head, to make everything look symmetrical. Now select the Ellipse Tool (enable Fill Pixels) and by Holding Shift drag a circle and position it as below:

Step 4: Right Click the Circle layer then go to Blending Options > Gradient Overlay and change the following:
Gradient Style: Radial
Gradient Colors:
0% - #ffe381
100% - #dfa018

Step 5: CTRL+Click the circle layer to make a selection of it, then create a new Layer and Fill it with White. Next press M (or select the Rectangular/Elliptical Marquee Tool) to go to the selection tool and move the selection to the right (make sure you are inside the selection tool and you're moving only the selection and NOT the circle), then hit delete:

You should end up with something like this:

Step 6: Now select the Rectangular Marquee Tool and make a small selection right under the middle guideline on the left part of the smiley's head (see the image) then hit Delete on your keyboard:

Step 7: Press CTRL+T inside this layer and by holding Shift+Alt drag one of the corners to the center to make it a bit smaller:

Step 8: With the Rectangular Marquee Tool select the bottom part of our higlight and cut it (Ctrl+X). Then Paste (CTRL+V) it inside a new layer:

Step 9: To make everything more clear I renamed each layer (see the image). Bring the bottom shine's layer (that you've just pasted) Opacity down to 65%:

Step 10: Make a new Layer (rename it Eye) and by holding Shift drag a small white circle with the Ellipse Tool (U). Also position the Eye layer as below. Then Duplicate the layer and move the second eye to the right part:

Step 11: Create a New Layer (rename it pupil) then change the Foreground color to Black and by holding Shift drag a smaller circle and place it inside the left eye. Then duplicate this pupil layer and place it inside the other eye as well:


Step 12: Create a New Layer rename it shine - Select the Ellipse Tool (U) and by Holding Shift create a smaller white circle and place it inside the pupil as in the image. Duplicate this shine layer and place it inside the other eye as well:

Step 13: a) Go to the Elliptical Marquee Tool and by holding Shift make a big circle selection as in the image below:

b) Now select the Rectangular Marquee Tool and by holding Alt make a selection from the outer half of this circle to the top to achieve a D shape as you can see in the image:

c) Right Click and Fill this Layer with White. Also rename the layer to mouth:

Step 14: Right Click the Mouth Layer > Blending Options > Gradient Overlay. Change the following:
Style: Liniar
Gradient colors:
0% - #ff4545
100% - #600000

Inside Stroke:
Size: 4px
Position: Outside
Color: #8a5f00

I also created some additional guidelines to position the mouth properly. You should have something like this so far:

Step 15: Create a New Layer and rename it Teeth. With the Rectangle Tool (U) create a rectangular shape to cover the top part of the mouth:

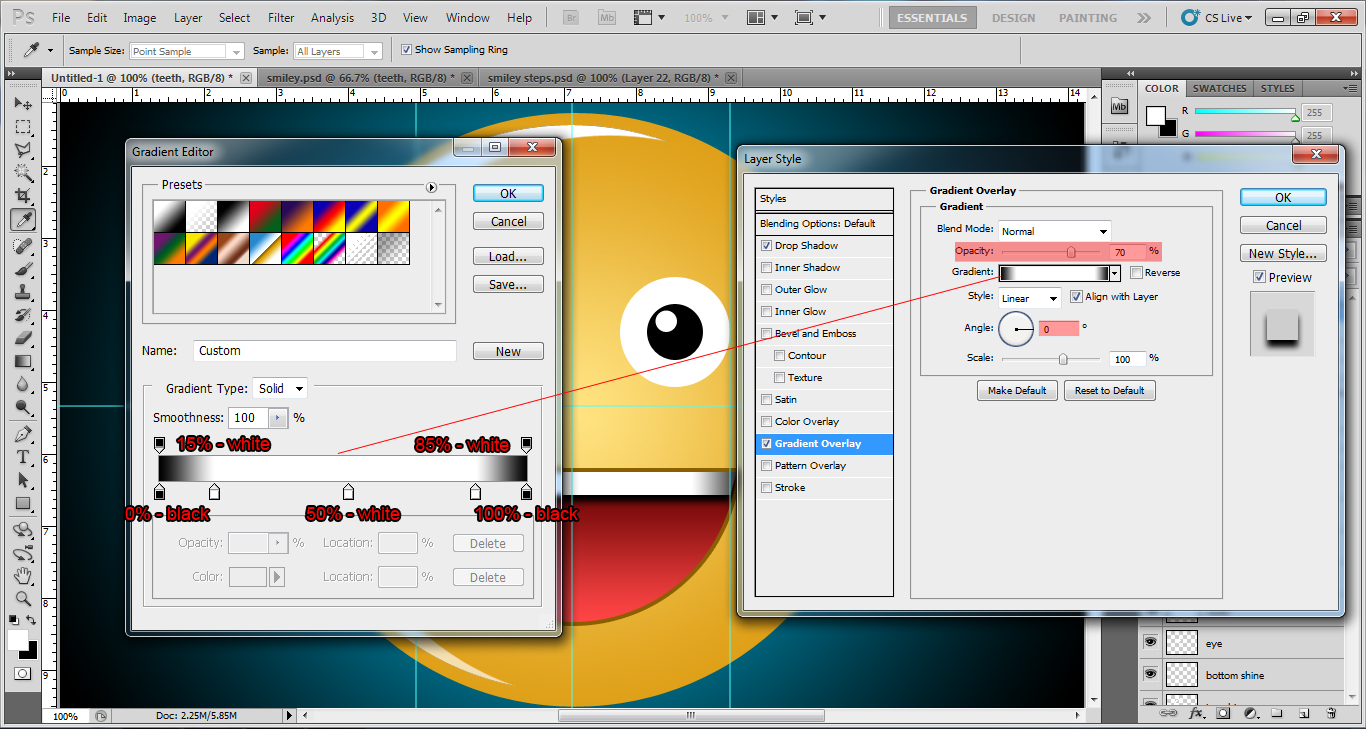
Step 16: Right Click the Teeth Layer > Blending Options > Drop Shadow:
Blend Mode: Multiply
Opacity: 100%
Distance: 7 px
Spread: 0 px
Size: 7 px

Inside Gradient Overlay:
Opacity: 70%
Style: Linear
Gradient colors:
0% - pure black
15% - pure white
50% - pure white
85% - pure white
100% - pure black
Step 17: Now we need to Transform the edges of the teeth a bit to match the mouth's shape. To do that press CTRL+T to bring up the Free Transform. Then hold CTRL and move the left bottom point and the right bottom point to make a trapezoid shape as below:

Step 18: Create a new Layer, rename it eyebrow. Select the Elliptical Marquee Tool (M) and with SHIFT pressed create a circle. Then by holding ALT cut the bottom part of the selection to obtain a moon shape as below:

Step 19: Duplicate and press CTRL+T > Flip Horizontal to flip the layer horizontally, then move the eyebrow to the right part:

Step 20: Select the guidelines and drag them back to the ruler to get rid of them. Also press CTRL on the head layer to create a selection of it, then inside a new layer (I renamed it shadow) Fill the Selection with Black and place this layer under the head one, move it a bit to the bottom right part to add a shadow. When you're happy with the positioning change this shadow's layer opacity to 70%.
Final result:

Thanks for watching! Hope this tutorial helped :D
For any questions please use the comment section below.
Also make sure to like the Blog's Facebook Page to keep in touch with the latest tutorials : www.facebook.com/VenomX3D
See you next time !